
Personal operative plan
| Field | To be completed on your hardcopy |
|---|---|
| Name | ________________ |
| MRN | ________________ |
| DOB | ________________ |
| DOS | ________________ |
| Side | R / L |
| Instruction | To be completed on your hardcopy |
|---|---|
| Anti-Rotational Bolster | ________________ |
| Hip Brace: Extension | ________________ |
| Hip Brace: Flexion | ________________ |
| Hip Brace: Duration | ________________ |
| Weight Bearing: Status | ________________ |
| Weight Bearing: Duration | ________________ |
| Anticoagulant: Dose | ________________ |
| Anticoagulant: Duration | ________________ |
| Heterotopic Ossification Prophylaxis: Dose | ________________ |
| Heterotopic Ossification Prophylaxis: Duration | ________________ |
| Losartan: Dose | ________________ |
| Losartan: Duration | ________________ |
| Finding / procedure | Options / record |
|---|---|
| Traction time | ________________ |
| Biopsy | ________________ |
| Synovial fluid | ________________ |
| Culture | ________________ |
| Synovectomy | Partial/Complete |
| Ligamentum Teres | Debridement/Reconstruction |
| Chondroplasty | Femoral Head/Acetabulum |
| Microfracture | Femoral Head/Acetabulum |
| Cartilage repair | Femoral Head/Acetabulum |
| Acetabulum | Rim trimming/AIIS decompression |
| Labrum | Debridement / Repair / Augmentation / Reconstruction |
| Femoral Head/Neck Osteochondroblasty | ________________ |
| Capsule | Closure/Plication/Reconstruction/Thermal |
| GT bursectomy | ________________ |
| Gluteus medius | Repair/Patch augmentation/Healing response |
| Psoas tendon | ________________ |
| Hamstring | ________________ |
| Injection | PRP/BMAC/Steroid/HA |
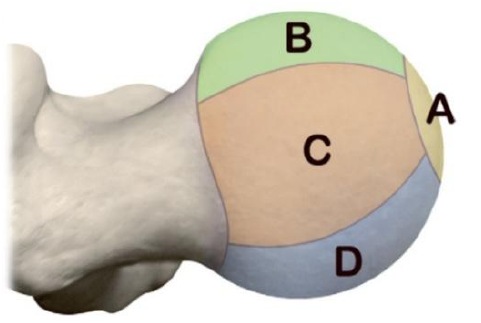
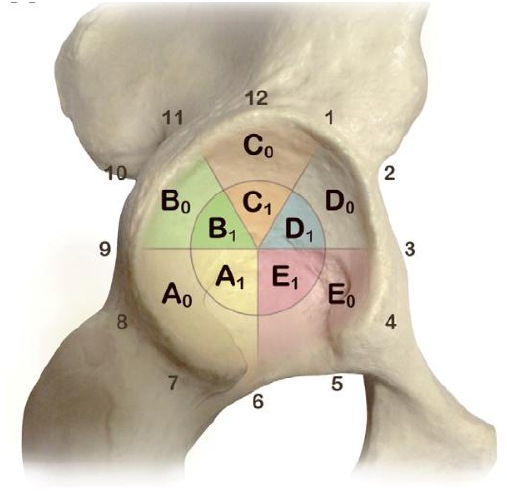
Post-op Hip Rehabilitation Guidelines
To Patient and Therapist,
Post-operative protocol is designed to maximize recovery following Hip Arthroscopy with Dr. Mazen Ibrahim. Hip joint will require exercise, movement, recovery, nutritional support, etc. but most of all, time is the healer. Knowing that, individuals will progress at their own pace, no two patients will follow the same path to recovery. Hip preservation research shows that patients show improvement for two full years following surgery. So, if you are 8 weeks, 6 months or even 18 months post-op and having a “bad hip day”, it is completely normal.
Activation/Strength exercises are performed with “one perfect repetition repeated until fatigued”. When the body properly adapts to the load and the exercises are no longer challenging, increases in repetitions, sets, or resistance can be used to further muscular development. Care should be taken to assess appropriate muscle firing patterns during each exercise with minimal compensation, as neuromuscular training is a vital aspect of appropriate muscle re-education.
Passive/Active range of motion movements should be relatively pain-free. It is not necessary or helpful to push into pain and/or pinching at end ranges. It should be comfortable and allow the patient to remain unguarded while the movements are performed and progressed.
Stretches should also feel good, not painful. Apply a mild stretch sensation to the target muscle, breathe into the stretch sensation until it dissipates. This should occur within 30-60 seconds. From there, a stretch sensation can be re-applied using the technique described above. If a stretch does not dissipate, it is a clear indication that the stretch is too aggressive. Start over with a milder stretch sensation.
Crutches
Weight through surgical leg to assist blood flow and keep nerves and muscles active. Partial flat foot weightbearing., then wean 10-15% per day (2-4 weeks).
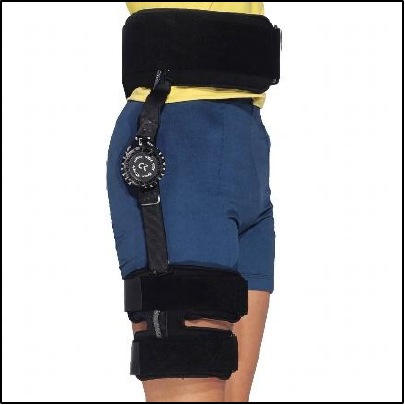
Hip Brace
0-90˚ flexion for 2 weeks, to reduce stress on the labrum repair. While walking (short car rides worth keeping on, long car rides take off). Avoid activating hip flexor, limit hyperextension.
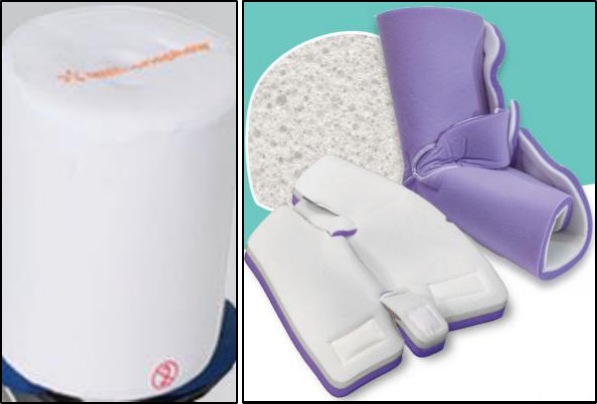
Anti-Rotational Bolster
While lying down flat (21 days). Prevents external rotation which puts stress on capsular repair.
Sleep
Sleep either on the back using the bolster, boots, and Velcro strap, or on the CPM, or on the surgical side with a pillow between your legs and feet secured in the boots and Velcro. Patient can sleep on either side after your external rotation restrictions are lifted (21 days). To avoid stress on the anterior capsule, refrain from lying on the stomach (for 6 weeks after surgery).
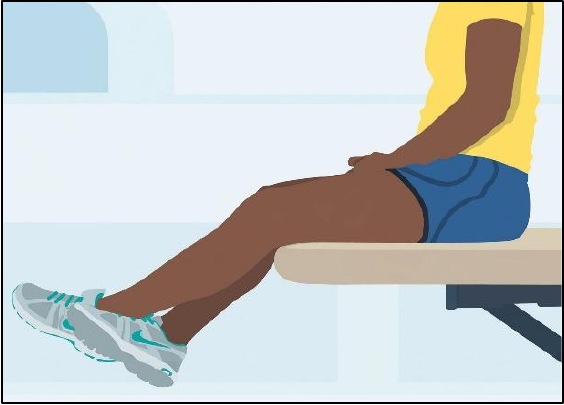
Limit Active Hip Flexion
To prevent irritating hip flexors (2 weeks). Use opposite leg to lift surgical leg on and off table. Use brace to get in and out of car and over obstacles. No restriction of passive hip flexion.
Sexual Activity
Permitted as long as it stays within the post-operative range of motion restrictions.
Ankle Pumps
10 times per hour (both legs) when awake, also using SCDs/calf squeezers, keep blood moving to prevent blood clots.
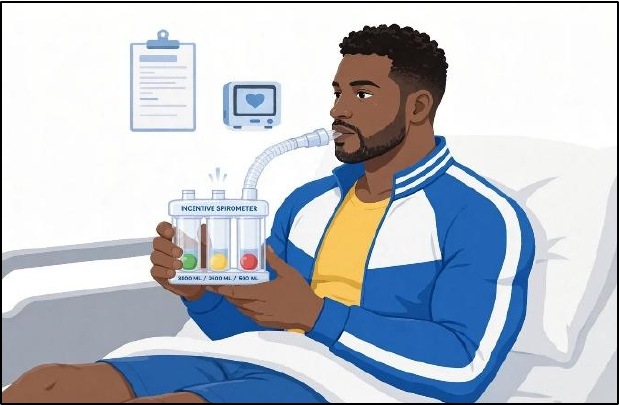
Incentive Spirometer
Perform 10 deep breaths throughout the hour while awake the first 2 weeks. Gets lungs back in shape after surgery, as anesthesia, and pain medications slow down breathing.
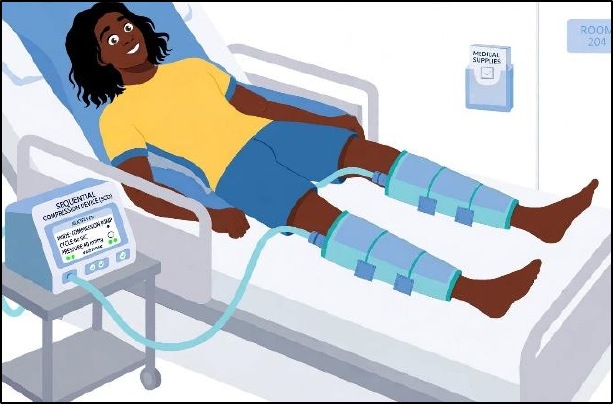
SCD’S/Calf Squeezers
While sedentary greater than 20 minutes (During: CPM, ice, travel, lying down and sleep). Prevents the formation of blood clots.
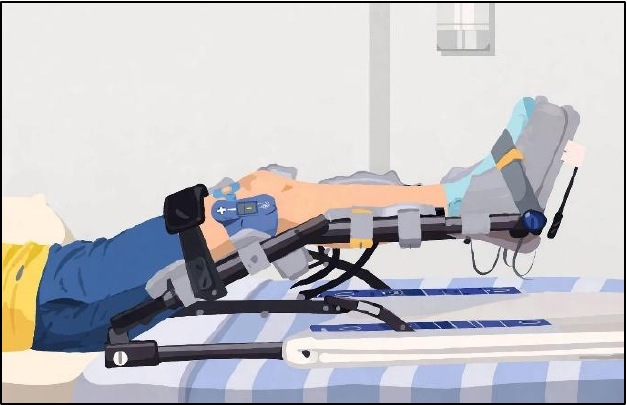
CPM
Helps to properly align collagen and reduces amount of scar tissue formation during the healing process.
ROM Settings: 10-45 first week; 0-60 second week; 0-70 third week; 0-80 fourth week and beyond (6-8 h/day)
Orient 10˚ out from midline of the body.
Place pillow/towel above outside of knee against thigh to control rotation and under opposite buttock to even out pelvis.
Place on the inside of bed so machine does not fall off.
Anticoagulant
After hip arthroscopy (2-4 weeks), anticoagulation is individualized. Direct Oral Anticoagulants (rivaroxaban, apixaban) are first-line for high-risk patients, while lower-risk patients may receive aspirin or shorter courses.
Chemoprophylaxis for heterotopic ossification
Celebrex 200mg twice daily is recommended for 2 weeks (unless contraindicated).
Post-operative adhesions and fibrosis prophylaxis
Clinical studies suggest, 12.5 mg of Losartan twice daily for 2 weeks may theoretically reduce fibrosis and intra-articular fibrosis. Losartan is an angiotensin II receptor blocker (ARB), has been investigated for its anti-fibrotic properties. It inhibits transforming growth factor beta (TGF-β), a key mediator in scar tissue formation, and may help reduce post-operative adhesions that can limit hip mobility or necessitate revision surgery. Monitoring for side effects such as hypotension or dizziness is recommended.
Other Medications
- Tylenol 500mg 2 tablets by mouth every 6 hours for baseline pain control.
- Methocarbamol (Robaxin) 750 mg every 8 hours as needed for muscle spasm (2 weeks).
- Oxycodone 5 mg 1-2 tabs by mouth every 4-6 hours as needed for pain (3 days).
- Ondansetron (Zofran) 4 mg every 8 hours as needed for nausea.
For constipation (while you are on narcotics):
- Senna 8.6 mg twice daily as needed.
- MiraLax 1-2 times daily as needed.
- Docusate (Colace) 100mg twice daily as needed.
- Melatonin as needed for insomnia.
- Benadryl as needed for itching.
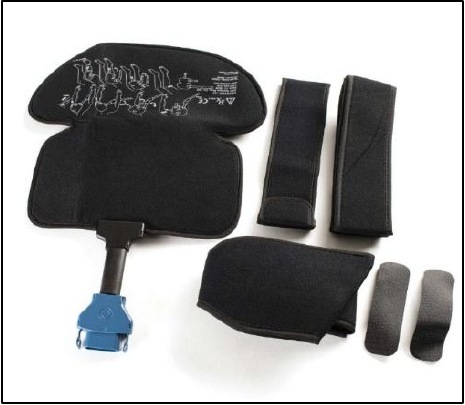
Ice Machine
Decreases pain, inflammation, and swelling. 3-4 / 20-30 min cycles throughout the day for 2 weeks. Do not use continuously overnight to avoid frostbite.
Incisions
Change bandages is indicated only if become saturated.
No baths, hot tubs, steam rooms or saunas while stitches are in.
Shower with waterproof bandages, if water gets in, change after shower. Skin should be clean and dry to ensure good adhesion.
Portal sutures are removed 14-21 days after surgery. Steri-strips are left to fall off on their own. Vitamin E could be used after stitches removal.
Numbness
Outside of thigh, top of foot and groin due to traction, resolves in weeks to months.
Returning to Work/School
Sedentary jobs: We recommend taking at least 2 weeks from work due to post-operative fatigue. Advised to get up from the workstation every 20 minutes to reduce stiffness.
Physically demanding job requiring a lot of walking, lifting, crouching, etc., most likely 8-12 weeks are needed before returning.
Driving
Automatic transmission: When the patient is off narcotics, feels comfortable behind the wheel (typically around 10-14 days post-operatively).
Manual transmissions: Right surgical hip Similar to automatic transmission. Left surgical hip 4-6 weeks post-operatively.
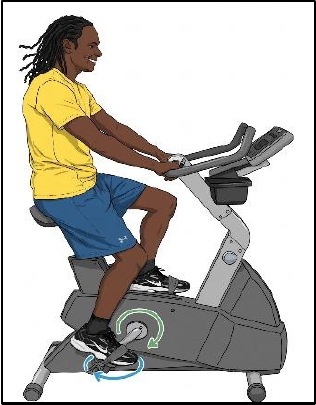
Bike
Stationary Bike, bike seat height is adjusted so knee does not flex beyond 5° at bottom of stroke. Non-operative provides the motion while operative leg “goes along for the ride” (10 minutes forward 10 minutes backward, twice daily).
Resistance could be added 6 weeks after surgery. Progress intensity and duration gradually as the surgical hip tolerates (provided no increase in hip pain).
At least at a level 5 on a stationary bike before cycling outside could be started first on flat terrain, preferably on a looped course, to allow for an easy exit strategy if the hip gets sore.
Circumduction
At least three sessions per day (for 10 weeks after surgery). Work in a pain free range from 45°-70° (10 minutes clockwise and 10 minutes counter clockwise).
Swim with/without Pull Buoy
Use a Thera-band around thighs and pull buoy to reduce overuse of hip adductors.
Kicking while swimming could begin 4 weeks after surgery, starting by a gentle kick and introduce it progressively.
Refrain from flip turns, breaststroke, and butterfly for at least 8 weeks.
Other Physiotherapy Modalities
1. Blood flow restriction training
BFRT could be started at least 4 weeks after surgery if it is available by a certified practitioner and the incisions are fully healed and suture out. BFRT guidelines and precautions should be followed.
2. Dry needling
To reduce the risk of infection, at least 6 weeks post-operative before dry needling could be performed.
3. Massage therapy
At least 4 weeks after surgery. Advised not to push into painful ranges of motion and not to perform axial distraction of the hip i.e. pulling on the foot towards the end of the table.
Post-operative X-rays
14-21 days post-operative.
Exercise Descriptions: Phase I (6-8 weeks): Mobility and Protection
Goals
- Protect integrity of repaired tissue.
- Restore range of motion.
- Diminish pain and inflammation.
- Prevent muscular inhibition.
Precautions
- Specific ROM restrictions.
- Weight bearing restrictions.
- Do not push through hip pain.
a. Isometrics
- Ankle pumps throughout day.
- Gluteal Sets: Tighten buttock muscles.
- Quadriceps Sets: Tighten thigh muscles.
- Transverse abdominus contraction.
b. Soft tissue massage
As needed, twice/day: gently flush out edema.
c. Stationary Biking
d. Passive ROM
Performed by therapist/caretaker twice/day.
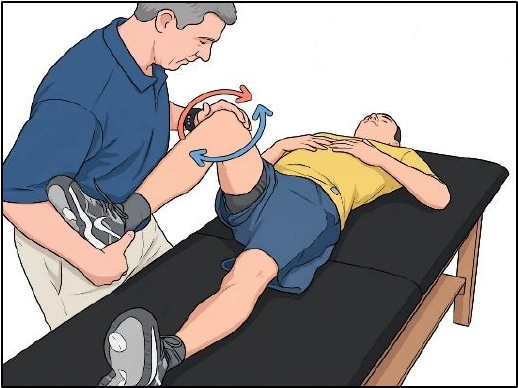
Circumduction
In Flexion: Lying on the back with the hip ~70° flexion, have partner move the knee in clockwise and counter clockwise.
In Neutral: Lying on the back with the hip and the knee straight, have partner move the leg in clockwise and counterclockwise.
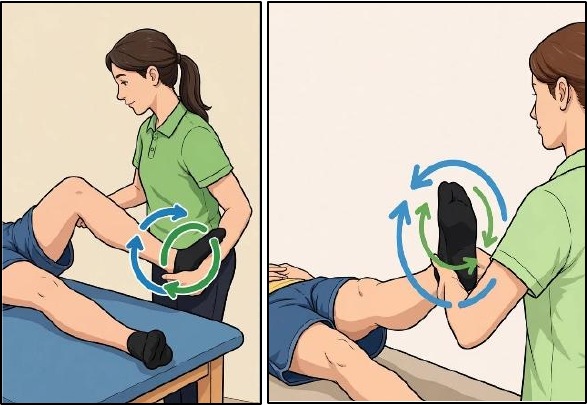
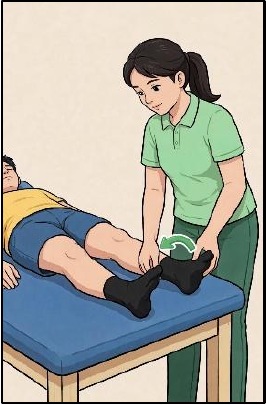
Supine hip roll (IR)
Lying on the back with legs straight, have partner rotate leg inward and roll back to neutral (no external rotation).
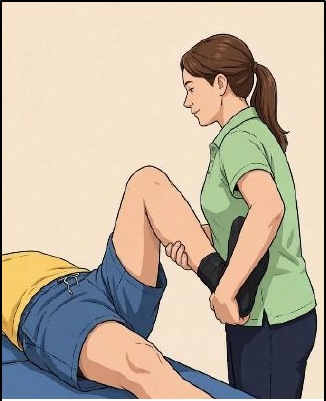
Flexion
Lying on the back have partner bring knee toward your chest.
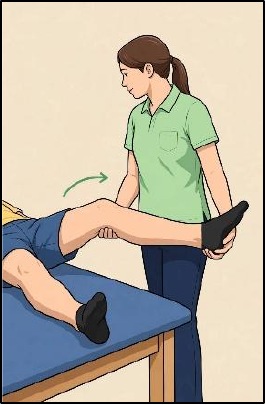
Abduction
Lying on the back with leg straight have partner bring leg away from your midline as tolerated.
Prone Internal Rotation (IR)
Lying on stomach with knee bent to 90°, have partner bring ankle away from the body (hip IR). Do not bring ankle in toward the body (external rotation) until allowed per ROM precautions.
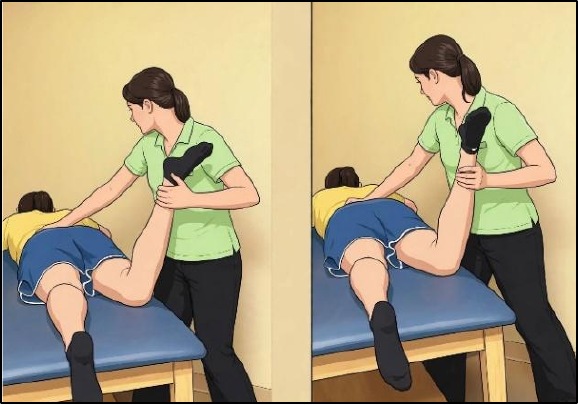
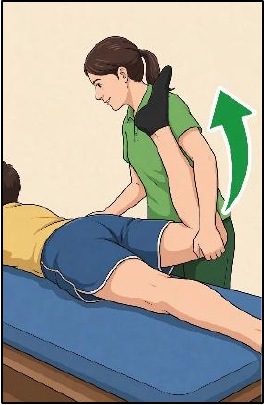
Extension
Lying on your stomach have partner grasp knee and lift leg up from the table.
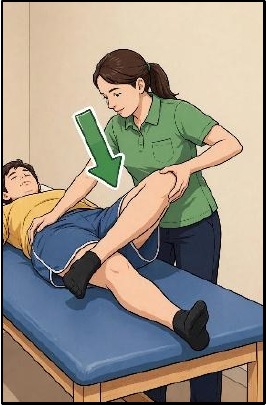
External Rotation / FABER position (after 3 weeks)
Lying on the back bring involved leg into figure four position with ankle resting above opposite knee. Gently lower bent knee towards the table.
e. Passive Stretching
Quadriceps Stretch
Lying on stomach, have partner bring ankle toward buttock, feeling a stretch in front of thigh. Perform before or after prone ROM exercises.
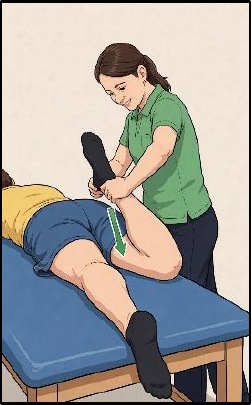
Piriformis Stretch
Lying on non-operative side, (bottom leg straight/pelvis stacked) bend involved hip to 50-70° flexion, hook top foot behind uninvolved knee. Stabilizing pelvis, lower the involved knee towards table. Stretch should be felt in buttock. Avoid pinch in groin. May need to start with pillows to support the leg. Sleep in this position when not in the CPM.
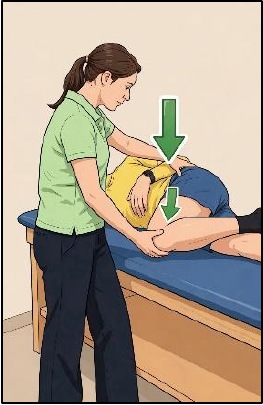
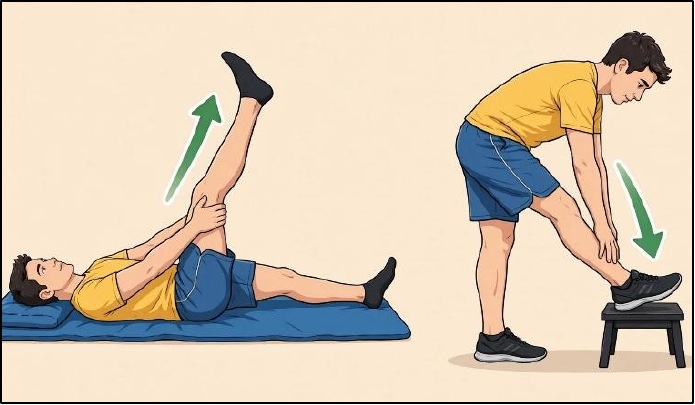
Hamstring stretch
Therapist assisted, on the back, sitting, or standing as tolerated.
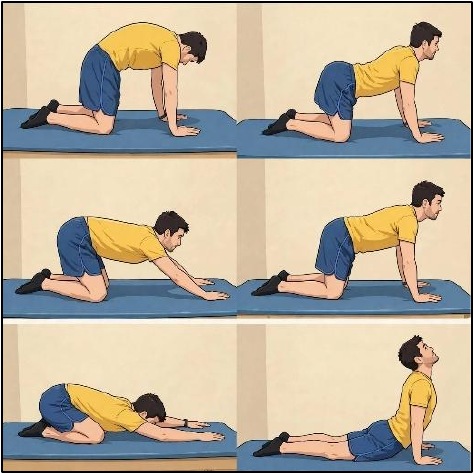
f. Quadruped Rocking
- Arch the back down then up as in cat and a camel exercise.
- With back in a straight position, shift the body weight forward on the arms then back onto the legs.
- Progress gradually to full motion as pictured to the right.
Phase II: Stabilization
Phase I with its emphasis on mobility must continue for 6-8 weeks; however, Phase II with its emphasis on stabilization, needs to be started early in week 2 while continuing to work on mobility.
Section 1: Stabilization Progressions
Goals
- Protect integrity of repaired tissue
- Restore PROM within restrictions
- Diminish pain and inflammation
- Correct Muscle Imbalances
Precautions
- Specific ROM restrictions
- Weight bearing restrictions
- Do not push through hip pain
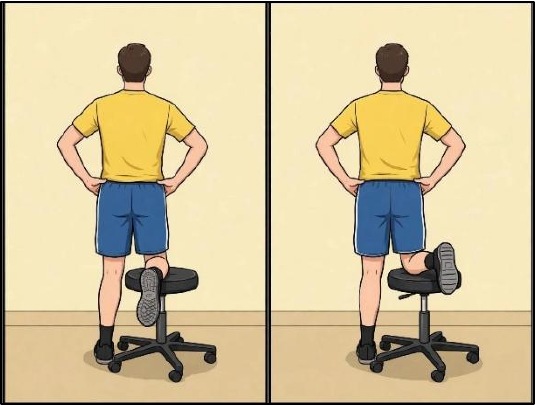
a. Stool Hip Rotations
Place knee of involved leg on a stool. Rotate hip without moving trunk, so that the stool turns (from neutral to internal rotation (moving your foot outward from the body) until ROM precautions are gone (3 weeks). Stool Hip Rotations with cord Progress to using a resisted band when tolerated.
b. Prone Hip Rotations
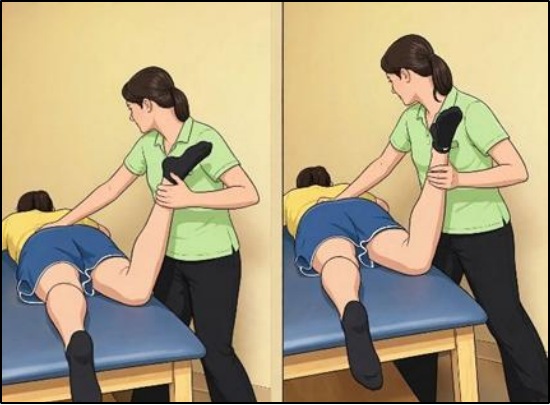
Facilitate deep hip rotators by lying on stomach with knee bent to 90°, allow foot to drop out so hip is in full IR. Actively rotate hip back to neutral per ROM precautions Partner can gradually add resistance to this motion. External rotation beyond neutral after ROM precautions are gone (3 weeks).
c. Prone Resisted Hamstring
Facilitate hamstring contraction by lying on the stomach and having partner manually resisting knee curls.
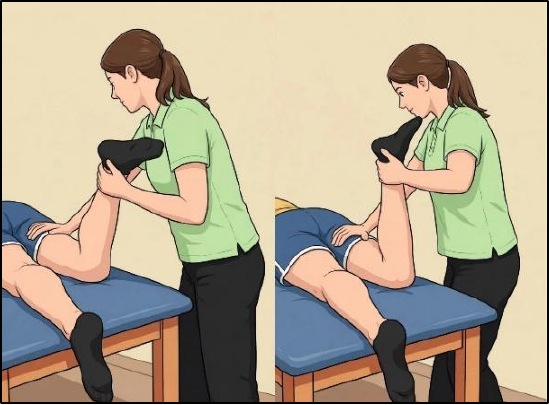
d. Prone / Glut Max Progression
Progress when able to hold stable + no pain.
Prone Resisted Glute Max
Facilitate contraction by lying on the stomach and having partner manually resisting hip extension while knee is flexed 90 degrees or greater. May place pillow under abdomen to keep hips in slight flexion as more glute max firing occurs in this range
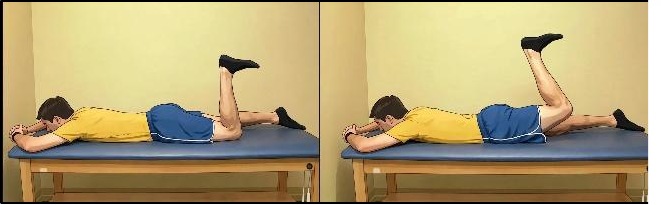
Stomach leg raises (glut max focus)
Lying on your stomach flex knee 90 degrees or further. Lift the knee off the table keeping the knee flexed. Raise your leg up 6-8 inches, keep hips anchored to table. (A towel may be wrapped around ankle pulling towards the head to assist in keeping the knee flexed)
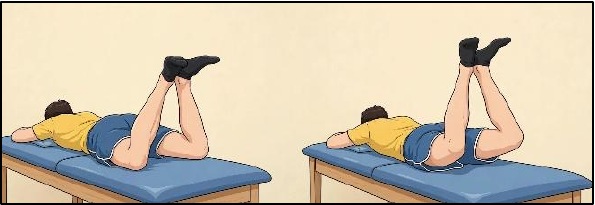
Prone heel squeeze
Lie on the stomach. Slightly separate then bend the knees about 45 degrees, place the heels together (Froggie). Draw abdominals in and squeeze heels together for 5 seconds. Increase difficulty by lifting the thighs off the mat with heel squeeze maintaining a stable pelvis. Do not arch the back
e. Supine/Flexor Progression
Progress when able to hold stable + no pain.
Heel Slides with Strap or Assist
Lying on the back place strap around foot, draw in transverse abdominus (TA) and use arms to pull heel towards your buttocks keeping heels on mat or have person assist the heel.
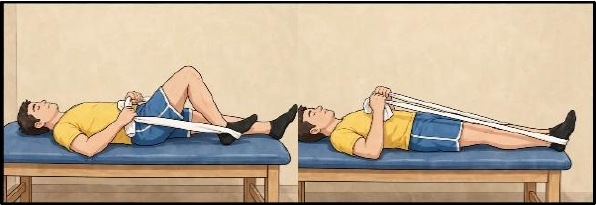
Heel Slides WITHOUT Strap
Reduce the use of strap or assist and use the hip flexor to slide the heel. Alternate legs.
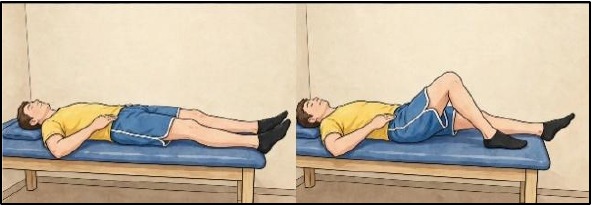
Marching
Perform the heel slide then lift the heel off table so hip and knee is bent to 90 keeping core stable, return leg to starting position. Alternate legs. Only lift heels if unable to keep back stable.
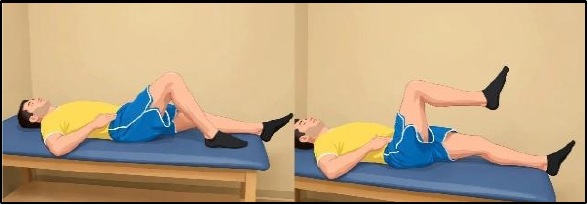
Table Top
Progress from marching to Table Top.
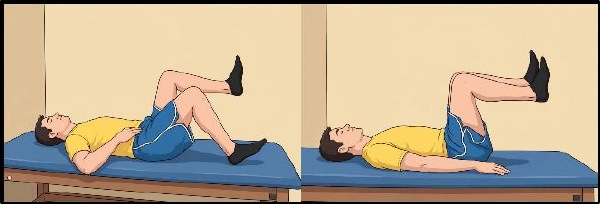
Table Top to Heel slide
Further progression includes sliding out each leg in the air as in “dead bug” exercises.
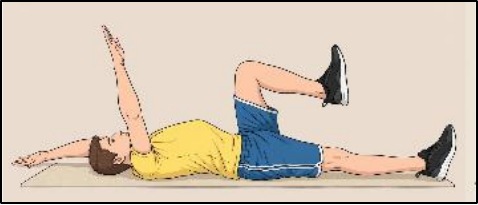
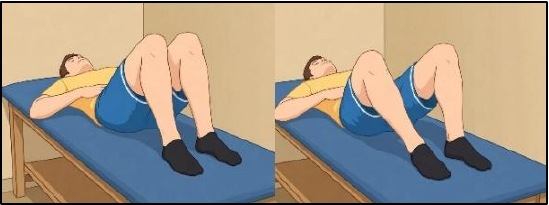
Bent Knee Fall Outs
(start when cleared for external rotation 3 weeks) Lie on the back with both knees bent. Contract the TA. Drop one bent knee to the side (only as far as you can tolerate). Do not let the opposite pelvis lift. Repeat on the other side.
f. Side-lying / Glut Medius Progression
Progress when able to hold stable + no pain.
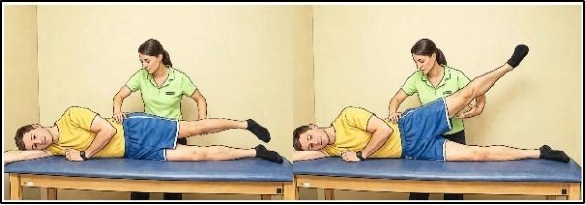
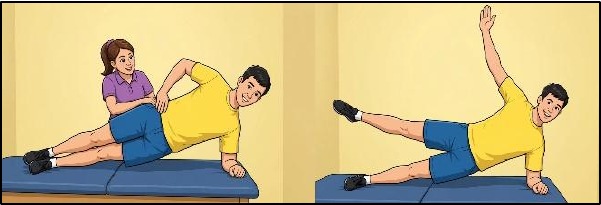
Assisted Side leg raises
Facilitate gluteus medius with assisted side lifts in muscle test position. Work on eccentrics (negatives) until patient can perform lift without pelvic compensation.
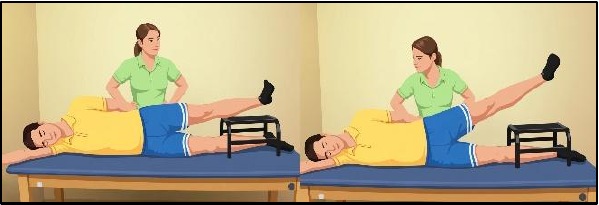
Side leg raises with step stool
Progress to utilizing a stool to perform lifts from easier start position. Focus on lifting up and slightly back without moving pelvis.
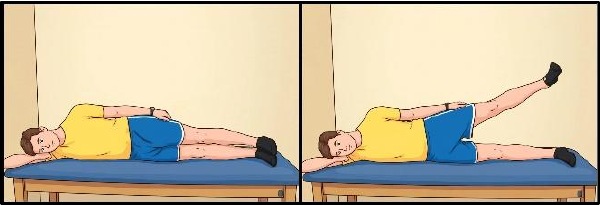
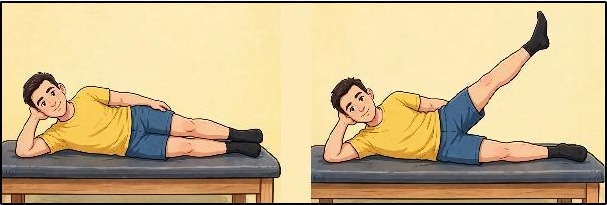
Side leg raises
Progress to raising top surgical leg without assist or stool and without moving pelvis.
Rose Wall Slides
Progress to lying on uninvolved side, shoulders, hips, and heels flush up against a wall. Slowly slide top involved heel along wall maintaining drawn in abdominal muscles.
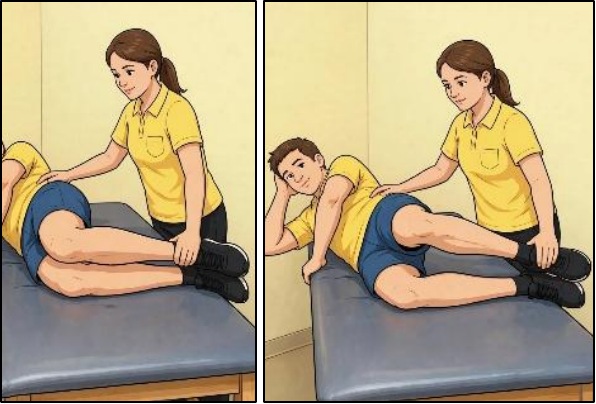
Neutral Hip Clams
Laying on the non-surgical side, hips straight and knees bent to 90 degrees. Engage TA & squeeze gluteal muscle to raise top knee without shifting pelvis, heels remain together throughout. Do not allow spine to collapse to table (after 3 weeks).
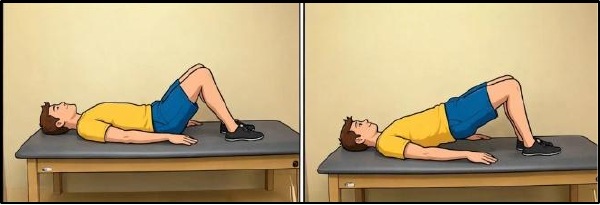
g. Bridge Progression
Progress when able to hold stable + no pain.
Double leg bridge
Lying on the back place rubber tubing around knees with hip and knees bent. Raise buttocks while keeping core stable then slowly lower.
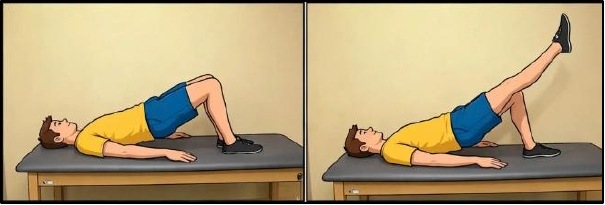
Single leg bridge
Progress to single leg bridging.
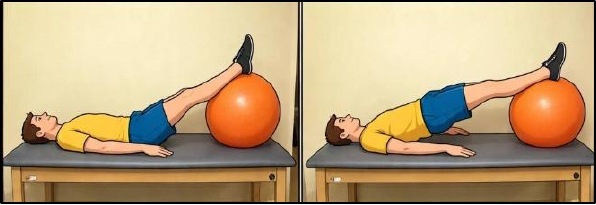
Bridge with feet on Swiss Ball
Lying on the back place feet up on swiss ball. Keep knees straight and core stable hold 5 seconds then lower.
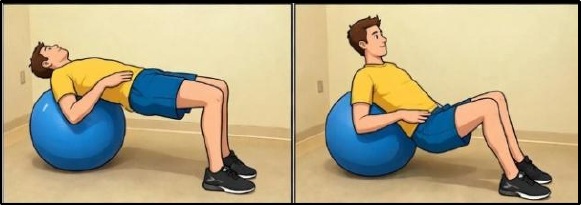
Bridge with shoulders on Ball
Progress to laying with shoulders on ball and feet on floor then lowering and raising the buttocks.
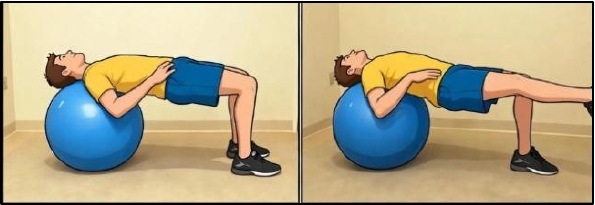
Bridge with single leg
Progress to lifting one leg by extending the knee then perform with the other leg. Do not go up and down with the hips.
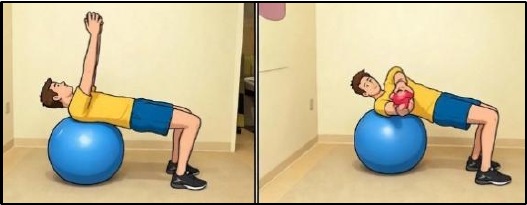
Bridge with Trunk Rotations
Add arm rotations in this position or perform with single leg bridge
h. Passive Stretching
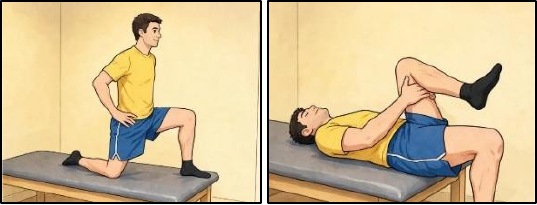
Kneeling hip flexor stretch
In a half kneeling position with the involved knee on the floor tighten TA and glut muscles. Shift weight forward while keeping trunk upright, feeling stretch in front of hip/thigh. Therapist can perform Thomas stretch in therapy
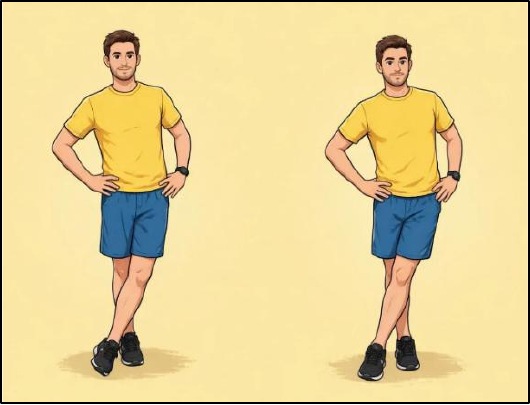
Iliotibial (IT) Band stretch
Standing, cross the non-surgical leg in front of the surgical leg. Keep the pelvis levelled and straight shifting the body weight over the surgical leg. Most of the weight should be on the surgical leg.
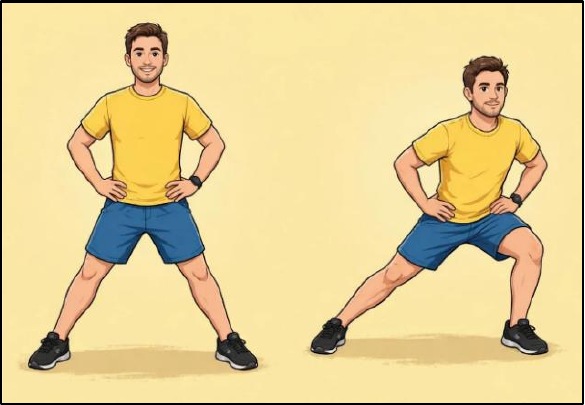
Adductor stretch
Standing, shift the weight onto the non-surgical leg while keeping the surgical leg planted and out to the side (see picture). Use your hand to push the pelvis a little farther toward the other leg to feel a stretch in your groin muscles.
i. Water Progression
Started after the stitches are removed UNLESS cleared and there is use of op-site dressings covering the sutures. Initially 10-15 minutes progressing to 20-40 minutes, 3 times/week
Options for pool therapy
Water Walking
Walk forward, backward and lateral in chest deep water. Emphasize normal weight shift to both sides, including microfracture patients.
Water Jogging
In deep water using an aqua-jogger or belt, jog in place.
Swimming
Frog kick (breast stroke) is a good internal rotation motion as long as there is no pinching; crawl or flutter kick works flexors and gluts but monitoring of hip flexor is important. Fins increase the load on the flexors so be more cautious. Using a pool buoy between the legs and just using arms is good for cardio without any precautions for the hip.
Exercises
Other exercise options should be cleared by the therapist.
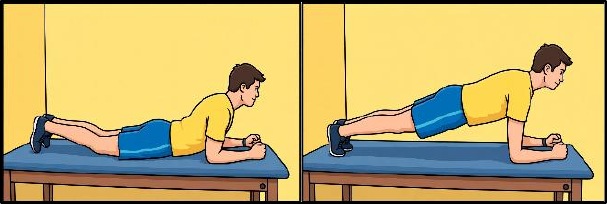
j. Planks
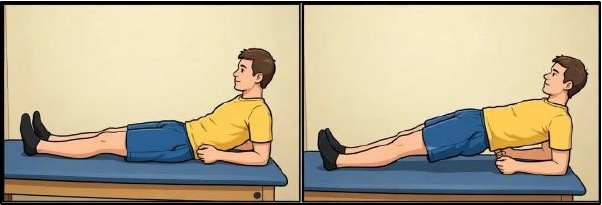
Supine Planks
Lie on the back propped up on the elbows. Contract the TA then lift the buttocks up off the table and maintain a straight “plank”.
Prone Planks
Lie on the stomach propped up on the elbows. Contract the TA then lift the hips up off the table and maintain a straight “plank”.
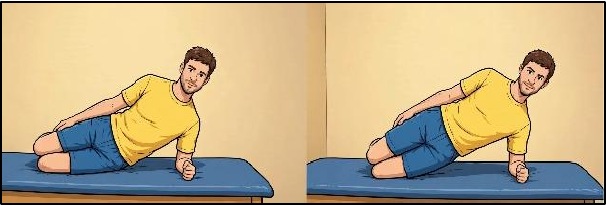
Side-lying Planks
Lie on one side propped up on the elbow, lift the pelvis and trunk up into a straight “plank”. Perform with knees bents if too difficult straight
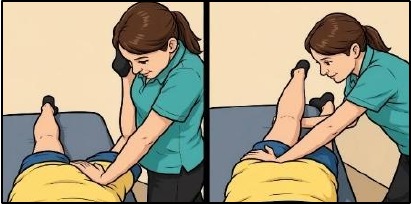
k. Manual joint mobilization
Please utilize only as needed. Do not OVERSTRETCH
Posterior Capsule
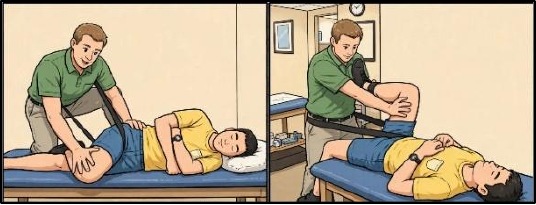
Medial Capsule
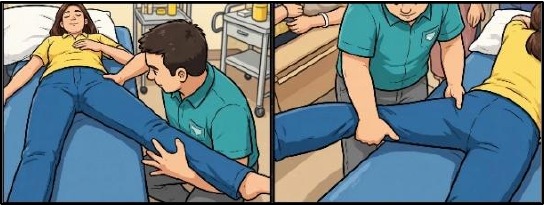
Lateral Capsule
l. Stationary biking with resistance
30-45 minutes but extremely variable per patient.
Increase resistance slowly while maintaining 60-80 RPM.
Use interval work to allow recovery of flexor muscle groups.
Initially reduce the time on bike when initiating resistance
FOR Cyclists
Assuming the use of a good pedaling motion there will be more muscle activation of the hip flexors than in the normal population therefore:
1st three weeks: use flats if on a trainer verses stationary bike
3rd to 4th weeks: can use clip-less pedals but with no resistance
PHASE II: Stabilization Section 2: Gait and “Closed Chain”
Goals
- Protect integrity of repaired tissue
- Restore PROM within restrictions
- Diminish pain and inflammation
- Restore Normal Gait Pattern
Precautions
- Specific ROM restrictions
- Do not push through hip pain or pinching
m. “Crutch weaning”
Weight shifting exercises
Forward, backward and lateral focusing on avoiding Trendelenburg/compensated Trendelenburg.
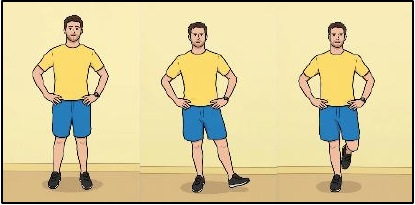
Single Leg Balance exercises
Focus on avoiding Trendelenburg/ compensated Trendelenburg
- Add 25% weight on surgical leg every 1-3 days until 100% continuing to use both crutches during this period. Return to crutches if needed to avoid early fatigue. Avoid limping and focus on correct walking weight shift and mechanics. Make sure patient is getting full hip extension.
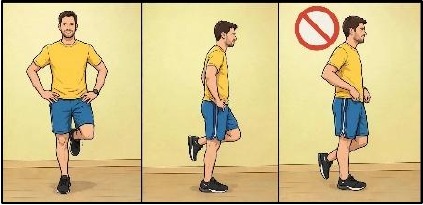
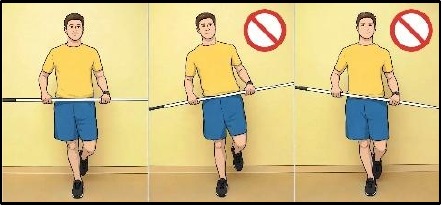
n. Balance Progression
Single leg balance on flat surface
Must be able to maintain single leg balance as noted in previous section before progressing to next exercises.
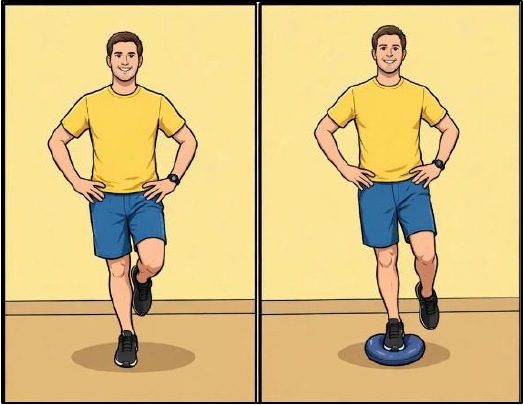
Star or clock exercise on flat surface
While standing with single leg balance on one leg; touch the opposite foot to spots on the ground marked at 9, 10.5, 12, 1.5, and 3 o’clock positions.
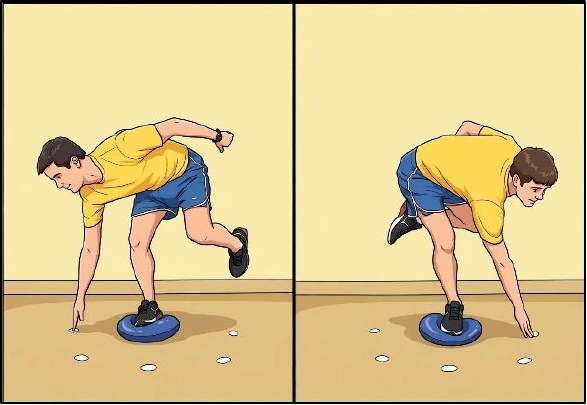
Dyna-disc or Bosu
Advance by using an unstable object such as the dynadisc or BOSU to perform single or double leg stance.
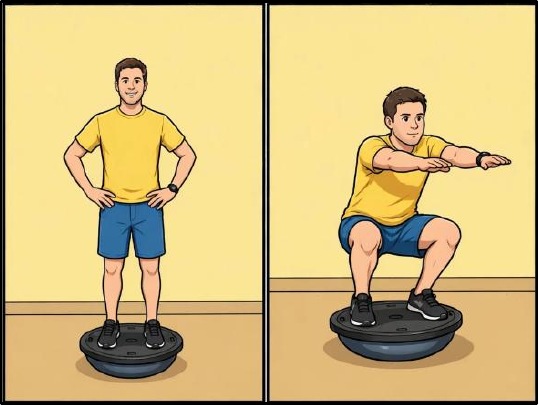
Star or clock exercise on dynadisc
Progress to performing the above noted star or clock ex. While on the dynadisc.
o. Double 1/3 knee bends
- Start standing with feet shoulder width apart, bend at the knees to 60º. Do not allow knees to go past toes.
- Progress by using a sport cord for resistance.
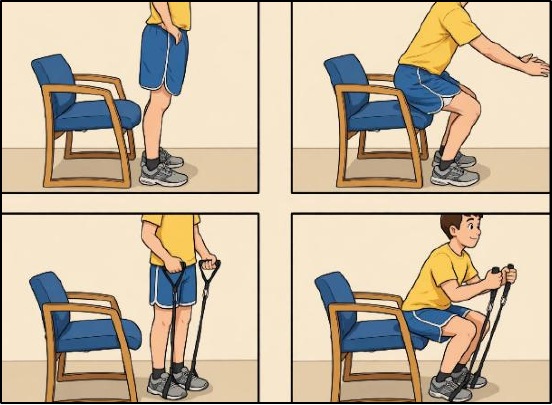
p. Leg press (limited weight)
Using light weight (20-30 lbs), perform leg press for endurance and muscle activation. Increase weight in Phase III.
q. Pilates
Footwork series, Skater series, hip extensions exercises should be performed on the reformer with an instructor:
r. Elliptical trainer
Begin with minimal resistance and progress intensity or time as tolerated.
PHASE II: Stabilization
Progression Criteria to Functional Exercises (running, skating, golf, dance) of Section 3
- NO Pain
- Full ROM
- Normal Gait
Section 3: Functional Exercises
Goals
- Correct residual muscle imbalances
- Restore normal gait pattern
- Tolerate early phases of function
Precautions
- Gradual progressions with activities
- NEVER use treadmill
- Avoid hip flexor, adductor and piriformis irritation
s. Functional Activities
Patients looking to return to work or “play” should slowly progress back to their functional activities that are part of their lifestyle.
Pro, Elite, Amateur or patients wanting to perform at higher activity levels should follow sport specific progressions.
PHASE III: Strengthening
a. Single Leg Closed Chain Progression
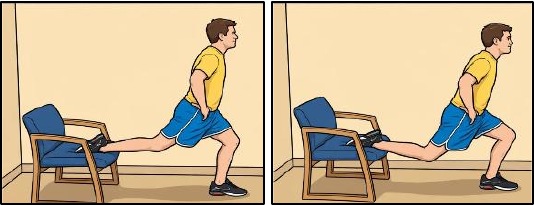
Balance Squats
With one leg behind on a chair, squat with your opposite leg to 70 degrees knee flexion. Perform with opposite leg on chair.
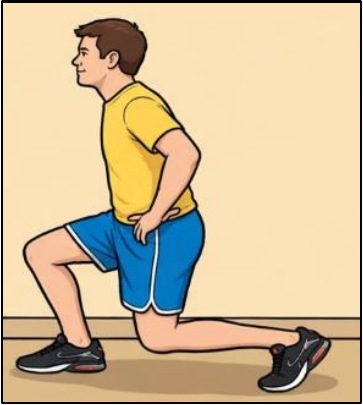
Lunges
Step forward with the involved leg while dropping the opposite knee straight down to the floor. Keep TA drawn in. Repeat with the opposite leg.
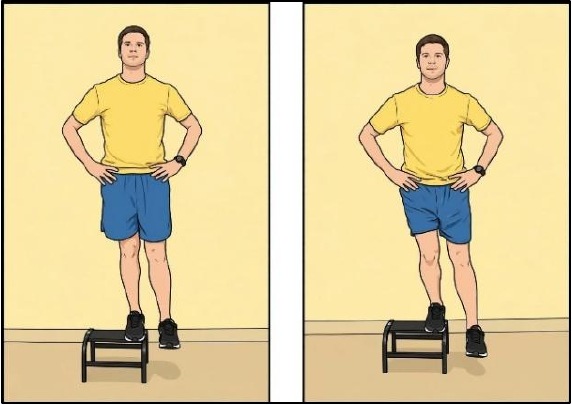
Lateral Step downs
Stand on the edge of a step (6-12 inches high) laterally with the involved leg. Bend the hip and knee keeping the pelvis level as if stepping down. Just touch the floor then return.
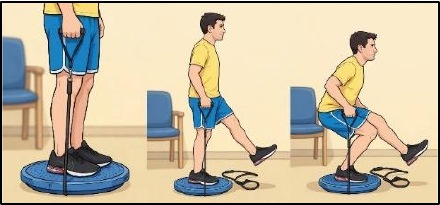
Single 1/3 Knee Bends
Same starting position as double knee bends but with only surgical leg. Bend knee to 60º flexion while maintaining a level pelvis and not letting the knee "fall in" (corkscrew).
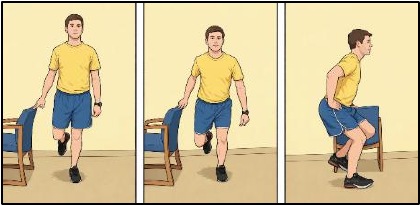
Single 1/3 Knee Bends with cord
Progress by adding cord for resistance (sport test exercise)
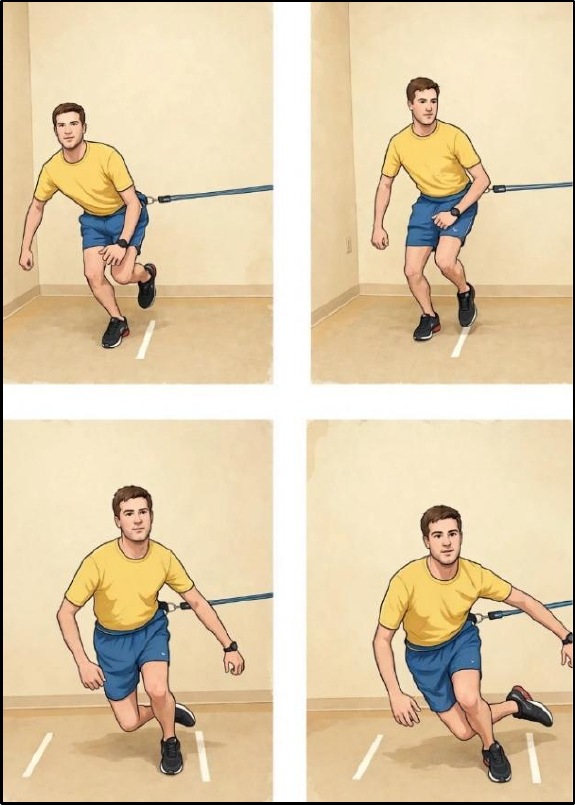
b. Side to side lateral agility with cord
Attach the sport cord from the side with the surgical leg facing the cord. Step sideways to create tension on the cord. The athlete will hop laterally with cord resistance from their surgical leg, land momentarily on their non-surgical leg, only to return onto their surgical leg with the cord pulling them back to the starting position for a total test time of 80 seconds. Each repetition of 1 second includes exploding laterally off the surgical side, landing momentarily on the opposite leg, and then returning to the starting position with emphasis on absorbing by bending at the hip and knee with 30 degrees of knee excursion. Excursion is defined as the amount of absorption from knee flexion at landing to max knee flexion.
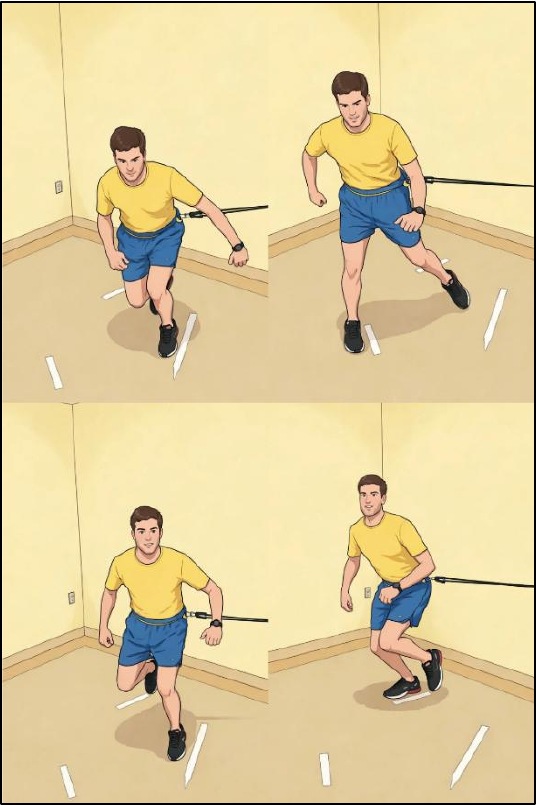
c. Diagonal side to side with cord
Attach the sport cord from the side with the surgical leg facing the cord. Step sideways to create tension on the cord. The athlete will hop diagonally forward at a 45º angle with cord resistance from their surgical leg, land momentarily on their non-surgical leg, only to return onto their surgical leg with the cord pulling them back to the starting position. The following repetition the athlete will hop diagonally backward at a 45º angle. The goal is 80 seconds, total. Each repetition of 1 second includes exploding diagonally forward or backward at 45º angles off the surgical side, landing momentarily on the opposite leg, and then returning to the starting position with emphasis on absorbing by bending at the hip and knee with 30 degrees of knee excursion. Excursion is defined as the amount of absorption from knee flexion at landing to max knee flexion.
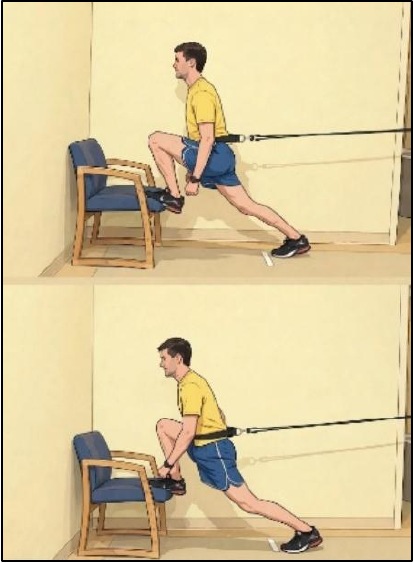
d. Forward Box Lunges with cord
The athlete will perform alternating forward lunges onto a box with cord resistance at a cadence of 2 seconds per lunge for a goal of 2.5 minutes. The movement is a forward lunge with maximum hip extension without compensation at the pelvis or spine throughout the 2.5 minutes.
Phase IV: Return to Sport
Functional Sport Test.
Passing the Sport Test means you are cleared per MD discretion!!!
Once the patient passes the Functional Sports Test, we leave the responsibility up to the patient and coach to continue to progress training for sport. This includes proper conditioning and sport specific agility.
- Multi-Plane Agility
- Advanced Plyometrics
- Sport Specific Training