
About this guide
Anterior Approach-Total Hip Arthroplasty
Patient information
Mazen Ibrahim, MD
Assistant Professor, Department of Orthopaedic Surgery
SUNY Downstate Health Sciences University
Office: 718-270-4335
mazen.ibrahim@downstate.edu
University Orthopaedic Associates
Brooklyn Hips
Department of Orthopaedic Surgery & Rehabilitation Medicine
DOWNSTATE HEALTH SCIENCES UNIVERSITY
450 Clarkson Avenue, Box 30, Brooklyn, NY 11203 · Phone 718-270-2045
We Care. Welcoming to All · Equity · Collaboration · Accountability · Respect · Excellence.
Introduction
In the 1960s, total hip arthroplasty revolutionized management of patients crippled with hip arthritis, with very good long-term results. Because of these very good long-term results, the procedure has been coined the ‘operation of the century’.
The Anterior Approach of the hip joint is an approach to the front as opposed to the lateral (side) approach to the hip through the hip abductor (gluteal) muscles or posterior (back) approach through the short rotators of the hip.
This Anterior Approach follows a natural interval between muscles to the hip joint. The gluteal muscles which are considered the most important muscles for hip function, attached to the posterior and lateral pelvis and femur, are left undisturbed.
Rehabilitation is accelerated and hospital time decreased because the hip is replaced without the detachment of the muscle from the pelvis or femur which accounts also for immediate stability of the hip and a low risk of dislocation. Unlike lateral or posterior approaches, following the Anterior Approach, patients are instructed to use their hip, immediately are allowed to bend their hip freely and avoid the cumbersome restrictions and the strict precautions that limit hip motion for the first two months after posterior or lateral approaches. Additionally, if patients are sexually active before surgery, there are no limitations on resumption of normal sexual activity after surgery.
The supine position of the patient (on his back) allows X-ray control during surgery with the image intensifier utilizing an integrated software systems with AI assistance for pre-operative planning and intraoperative execution that is designed to provide accurate, real-time templating and assist in precise positioning of total hip replacement components.
The Operating Table
Following anesthesia, the patient is positioned on a specialized table (HANA® table), to facilitate surgery through less invasive approach. The carbon fiber spars that support the legs move appropriately and manipulate the operated leg during surgery. Additionally, the table has a sterile robotic hook attachment that reaches inside the incision to lift and hold the femur in an accessible position.
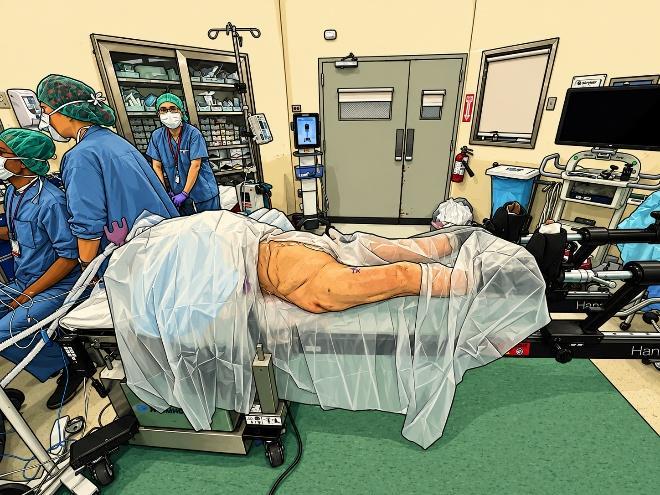
Anterior Approach
Skin incision is about 4-inches but may vary (shorter or longer) according to a patient’s body size. The hip is exposed by following a natural plane between muscles and without detachment of muscle or tendons from the bone. The femoral capsule is opened and the femoral neck is exposed.
The femoral neck is cut and the arthritic femoral head removed.
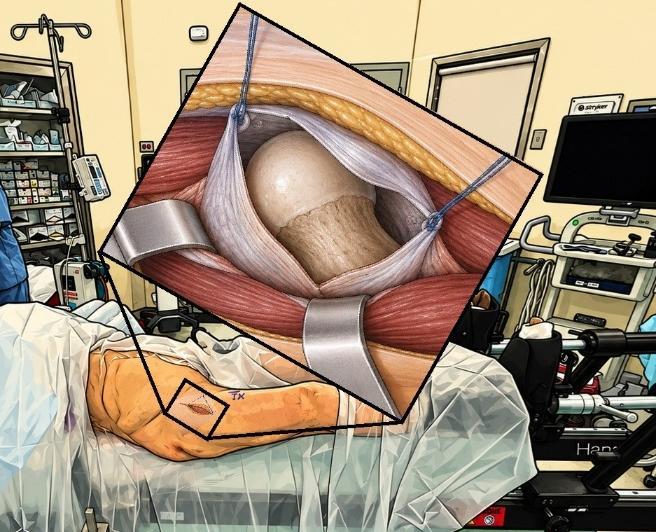
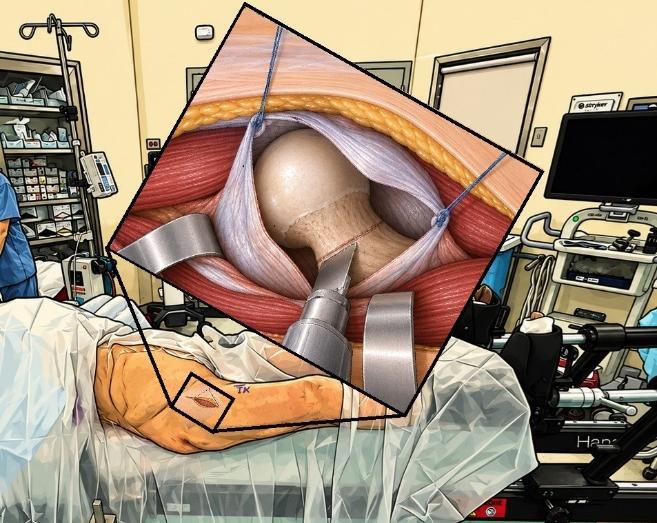
Acetabular Preparation
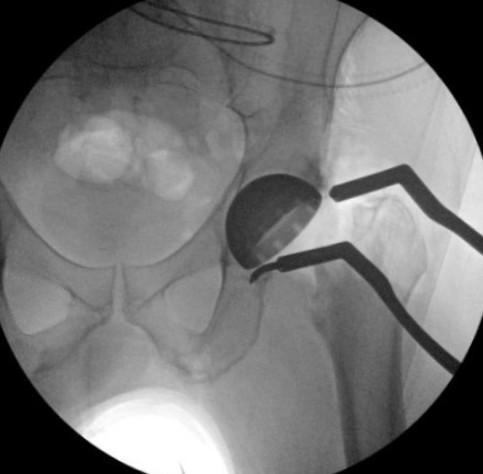
The arthritic acetabulum is reamed. A hemispherical shaped reamer rotates on the end of a shaft. Reamers of gradually increasing diameter accurately shape the bone of the acetabulum to accept the acetabular prosthesis.
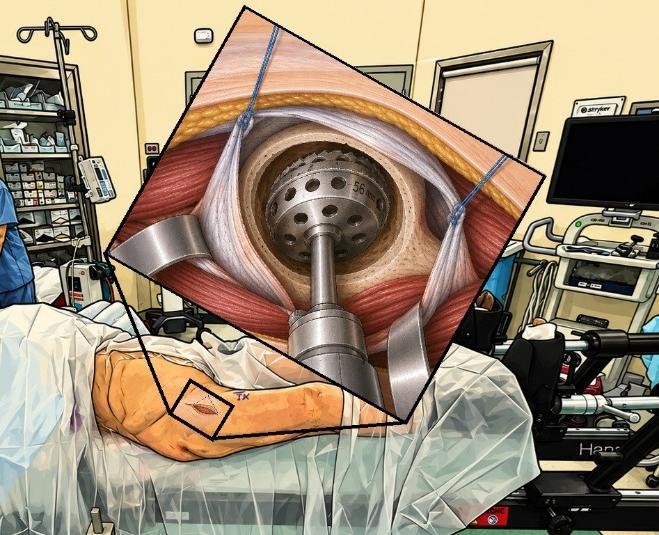
Acetabular Prosthesis
The acetabular prosthesis, is a titanium acetabular “shell”, slightly larger in diameter than the prepared acetabular cavity, is inserted with a “press” fit that produces initial stability. Long term stability relies on the biologic process of bonding of the bone to the porous acetabular surface. During insertion, active X-ray control with the image intensifier utilizing an integrated software systems with AI assistance is used to position the acetabular prosthesis (cup) accurately. Precise cup positioning minimizes the chance of hip dislocation and the bearing surface wear while allowing for a functional range of hip motion. AI assistance automatically identifies cup ellipse in real time providing instantaneous cup position insights.
Following insertion of this titanium acetabular “shell”, the bearing surface (polyethylene, or ceramic) is inserted.
Femoral Preparation
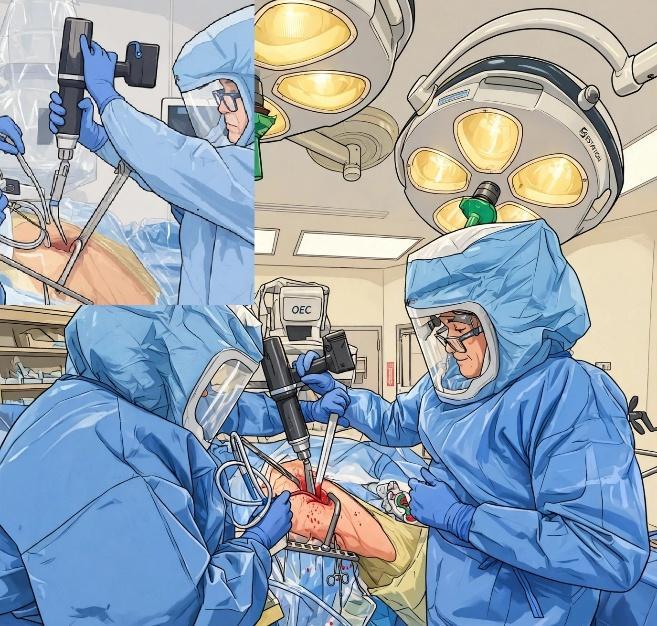
The table rotates the leg externally (foot pointed outward) and extends the hip, lowering the foot towards the floor to allow femoral access through this small approach. The femoral hook raises the femur to a more accessible position and holds the femur securely.
Using rhythmic impaction, a specialized tool called the Kincise™ Surgical Impactor, inserts a broach into the femoral canal. Progressively larger broaches are then inserted.
The broach size is limited by the hard outer cortical bone.
Sizing
Following insertion of the final broach, is temporarily left in as a “trial” femoral prosthesis and a trial neck and head are attached to its upper end.
The table repositions the leg to its normal position and the trial head is “reduced” into the acetabulum. X-ray control utilizing navigation system integrates leg length and offset data with a visual overlay, providing actionable guidance for implant selection to potentially reduce OR time and fluoroscopy dose.
The Femoral Prosthesis
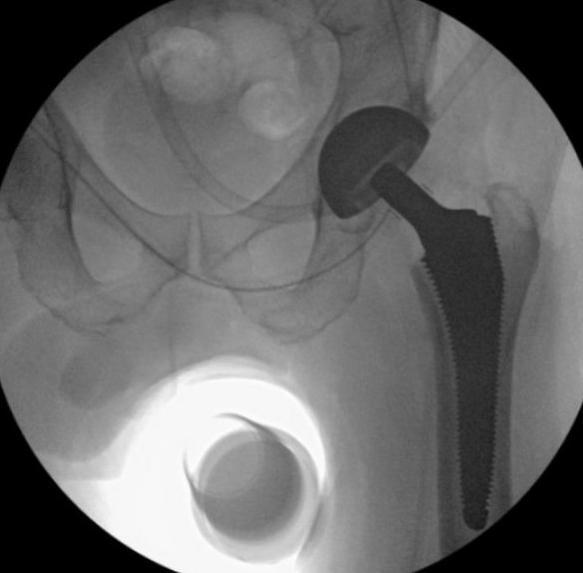
Based on the sizing of the trial phase, a femoral prosthesis of matching size is impacted using the Kincise™ into the cavity created by the removed broach.
The prosthetic femoral ball head is impacted with specific force by Kincise™ onto the inserted femoral prosthesis.
The prosthetic hip is reduced by moving the leg into its normal position as the femoral head is reduced into the acetabulum.
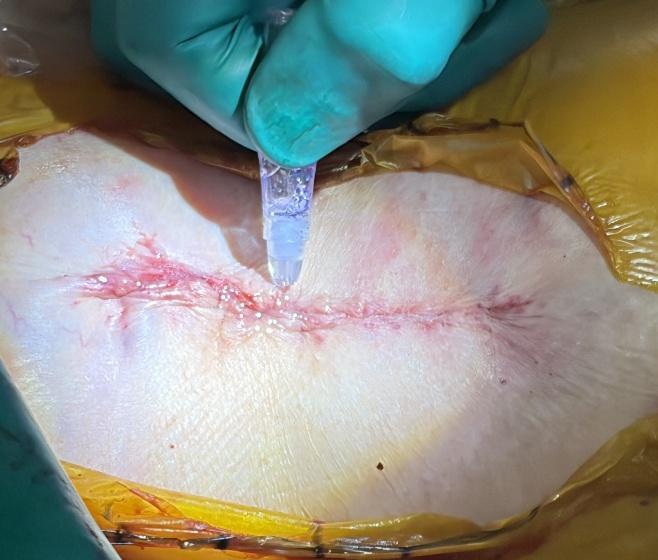
The wound is washed with irrigation solution and closed with dissolvable sutures under the skin, surgical glue and outer water proof dressing.
Postoperative
The first 2-3 hours following surgery, the patient is closely monitored in the recovery room. Evaluation and assessment by a physical therapist begin following surgery and leads to walking and functional activities.
Patients may go home after achieving an initial degree of independence in walking with crutches or a walker, as well as capabilities in basic day to day activities.
Patients are commonly discharged the day of surgery or the first day following surgery depending on their degree of disability prior to surgery and their overall capabilities.
On average, patients spend 1 night in the hospital recovering, and receiving medications for pain management, preventing infection, and the prevention of deep vein thrombosis (blood clots in large veins), and pulmonary embolus (blood dots traveling through veins to the lungs). X-rays will be taken at same day after surgery for a final assessment of the result and confirm precise positioning of total hip replacement components.
After Discharge
The hospital stay is 1-2 days, depends on how rapidly pain subsides and progress in physical therapy. At discharge pain medication is prescribed as well as an anticoagulant to prevent blood clots, in addition to OTC medications for constipation, insomnia and itching as needed.
Some degree of pain after discharge is natural, varies from one patient to another, which may increase or decrease on different days, but the general trend should be toward decreasing pain. Numbness and a tingling sensation are common around the incision area.
The skin incision is closed with dissolvable sutures under the skin, surgical glue and outer water proof dressing. The outer dressing could be changed if soaked or peeled. Please do not remove the surgical glue which will be present approximately 2 weeks. The patient can shower starting the day after your surgery. Allow water to run over your incision site, do not scrub. Avoid tubs, pools, etc. or any soaking or scrubbing of the surgical site for at least two weeks.
Bruising in the thigh and calf is normal with surgery and may not appear until several days afterwards. Some spotting from the incision is normal, however, if dressing soaking is significant, please notify us.
Thromboembolic Deterrent (TED) stockings, Compression Socks and Sequential Compression Device (SCD) machines will be prescribed at surgery. TED stockings should be worn for 3-4 weeks postoperatively to reduce the risk of blood clots in the legs (deep vein thrombosis/DVT). TED stockings may be removed for showering and for sleeping. We strongly recommend wearing them for any sedentary period longer than 20 minutes. In addition to the TED stockings, it is recommended to getting up and moving around every 60-90 minutes post-operatively.
Following the Anterior Approach, patients are instructed to use their hip, immediately are allowed to bend their hip freely and avoid the cumbersome restrictions and the strict precautions that limit hip motion for the first two months after posterior or lateral approaches. Additionally, if patients are sexually active before surgery, there are no limitations on resumption of normal sexual activity after surgery.
Physical Therapy and Activity
For the first two weeks after hip surgery, your primary means of activity should come from walking. There are no restrictions from walking up or down stairs. Sleep is permitted in any position found to be comfortable.
Discomfort and swelling will dictate the level of activity. To reduce swelling and discomfort, ice the hip for 20 minutes on, then 40 minutes off during the course of the day and leg elevation when sitting or resting. It is important always to have a layer between the ice and the skin to prevent frost bite. The patient can stop using any assistive device (crutches/canes/walkers) when he feels stable walking independently.
Light activities may be resumed two weeks after surgery. This includes light hiking, stationary cycling, and chipping/putting. Return to activities slowly and gradually over time. It is common to have fluctuations in pain and swelling as activities are restarted.
Activities that risk high impact falls on the hip should be avoided until 12 weeks after surgery: i.e. outdoor biking, skiing.
Twelve weeks after surgery, more strenuous activities may begin: skiing, doubles tennis, more aggressive hiking/climbing, and resuming full swing activities with golf.
In general, formal physical therapy is not required following hip replacement. We can provide a PT prescription at pre-operative visit, if requested, however we don’t advise to start PT until at least two weeks after surgery to allow wound and tissue healing.
Patient may return to driving when he is no longer taking narcotic pain medications and can safely operate a vehicle (good function of your leg muscles). Tylenol, meloxicam or ibuprofen are ok to take for continued discomfort while driving.
Dental, Urological, Gastrointestinal Procedures after Hip Replacement
We recommend waiting 3 months after surgery prior to any dental, urological or gastrointestinal procedures including dental cleanings and colonoscopies. For 1 year after surgery, prophylactic antibiotic should be prescribed and administrated prior to dental cleaning.
https://www.orthoinfo.org/globalassets/pdfs/orthoguidelines_cpg_dental-timing-chart_1-2-25.pdf
Individuals with a history of recent or frequent urinary infections should have a urological evaluation before surgery. Older men with prostate disease should consider completing required treatment before having total hip replacement surgery.
Postoperative Appointments/Follow-Up
Follow-up outpatient visits are necessary to monitor progress by X-ray and physical examination. The first follow-up visit is usually scheduled about 2 weeks after surgery to check on the wound healing and to confirm if the patient no longer needs prescribed pain medications, and the second at 6 weeks after surgery to assess the implant.
Subsequent follow-up visits are at 3-months 1-year and 2 years after surgery and then at 2-3 years intervals.
Outcome
While several surgical options have been described for the treatment of acetabular anatomic abnormalities, PAO remains the preferred option, giving marked improvements in functional outcomes as well as preventing long-term cartilage degeneration. Optimization of the joint surface area in the weightbearing region of the hip and improvements in the mechanical advantage of the abductor musculature are thought to provide most of the symptomatic improvements postoperatively. PAO outcomes have shown good symptomatic improvements, low complication rates, and an 18-year hip joint survival rate of >75%.
References
- Issa, K., Pierce, T. P., Brothers, A., Festa, A., Scillia, A. J., & Mont, M. A. (2017). Sexual Activity After Total Hip Arthroplasty: A Systematic Review of the Outcomes. The Journal of arthroplasty, 32(1), 336-340.
- Gofton, W. T., Ibrahim, M. M., Kreviazuk, C. J., Kim, P. R., Feibel, R. J., & Beaulé, P. E. (2020). Ten-Year Experience With the Anterior Approach to Total Hip Arthroplasty at a Tertiary Care Center. The Journal of arthroplasty, 35(5), 1281-1289.e1.
- Matta, J. M., & Ferguson, T. A. (2005). The anterior approach for hip replacement. Orthopedics, 28(9), 927-928.
- Taunton M, Sierra R, Kaufman K, et al. A randomized clinical trial of direct Anterior Approach and mini-posterior approach total hip arthroplasty: which provides better early functional recovery? Orthopaedic Proceedings. 2018 100-B:SUPP_1, 46-46.
- Miller LE, Gondusky JS, Bhattacharyya S, Kamath AK, Boettner F, Wright J. Does Surgical Approach Affect Outcomes in Total Hip Arthroplasty Through 90 Days of Follow-Up? A Systematic Review With Meta-Analysis. J Arthroplasty. 2017: 33(4); 1296-1302.
- Matta, J.M.: Anterior Approach for Total Hip Replacement: Background and Operative Technique, Chapter 8 p.121-140; MIS Techniques in Orthopaedics (Scuderi, G.R.; Tria, A.J.; Berger, R.A. editors); copyright Springer Science + Business Media, Inc.